1、Nginx
业务背景
现公司需求快速搭建web服务器,对外提供给用户web服务。
需求拆分
需要基于http协议的软件,搭建服务实现
1.1、介绍

常见用法:
1) web服务器软件 httpd http协议
同类的web服务器软件:apache(老牌) nginx(俄罗斯) IIS(微软)
2)代理服务器 反向代理
3)邮箱代理服务器 IMAP POP3 SMTP
4)负载均衡功能 LB loadblance
Nginx架构的特点:
①高可靠:稳定性 master进程 管理调度请求分发到哪一个worker=> worker进程 响应请求 一master多worker
②热部署 :(1)平滑升级 (2)可以快速重载配置
③高并发:可以同时响应更多的请求 事件 epoll模型 几万
④响应快:尤其在处理静态文件上,响应速度很快 sendfile
⑤低消耗:cpu和内存 1w个请求 内存2-3MB
⑥分布式支持 :反向代理 七层负载均衡
官方网址:http://nginx.org/
1.2、安装
常见安装方式:
①yum安装配置,需使用Nginx官方源或者EPEL源
②源码编译
 #添加运行用户
  shell > useradd -s/sbin/nologin -M www
  #安装依赖
  shell > yum -y install pcre-devel zlib-devel openssl-devel
  #编译安装
  shell > cd /root/soft
  shell > tar xvf nginx-1.14.2.tar.gz
  shell > cd nginx-1.14.2
  shell > ./configure --prefix=/usr/local/nginx --user=www --group=www --with-http_ssl_module --with-http_stub_status_module --with-http_realip_module && make && make install
编译参数说明
参数 | 作用 |
--prefix | 编译安装到的软件目录 |
--user | worker进程运行用户 |
--group | worker进程运行用户组 |
--with-http_ssl_module | 支持https 需要pcel-devel依赖 |
--with-http_stub_status_module | 基本状态信息显示 查看请求数、连接数等 |
--with-http_realip_module | 定义客户端地址和端口为header头信息 常用于反向代理后的真实IP获取 |
1.3、目录介绍
查看安装目录/usr/local/nginx
目录 | 作用 |
conf | 配置文件 |
html | 网站默认目录 |
logs | 日志 |
sbin | 可执行文件 [软件的启动 停止 重启等] |
1.4、软件操作参数
查看nginx的二进制可执行文件的相关参数
 shell > cd /usr/local/nginx/sbin
  shell > ./nginx -h
执行后显示
 nginx version: nginx/1.14.2
  Usage: nginx [-?hvVtTq] [-s signal] [-c filename] [-p prefix] [-g directives]

  Options:
  #查看帮助
    -?,-h         : this help
  #查看版本并退出
    -v            : show version and exit
  #查看版本和配置选项并退出
    -V            : show version and configure options then exit
  #检测配置文件语法并退出
    -t            : test configuration and exit
  #检测配置文件语法打印它并退出
    -T            : test configuration, dump it and exit
  #在配置测试期间禁止显示非错误信息
    -q            : suppress non-error messages during configuration testing
  #发送信号给主进程  stop强制退出  quit优雅的退出  reopen重开日志   reload重载配置
    -s signal     : send signal to a master process: stop, quit, reopen, reload
  #设置nginx目录  $prefix路径
    -p prefix     : set prefix path (default: /usr/local/nginx/)
  #指定启动使用的配置文件
    -c filename   : set configuration file (default: conf/nginx.conf)
  #在配置文件之外设置全局指令
    -g directives : set global directives out of configuration file
一般主要使用:
-s参数控制管理nginx服务
-V参数查看nginx开启的模块和编译参数
-t参数检测配置文件是否有错误
2、Keepalived实现高可用
业务背景
单例web服务器能够满足业务基本需求,提供web服务。但是,存在单点故障的问题,即当服务器宕机后,用户将无法获取到服务响应。
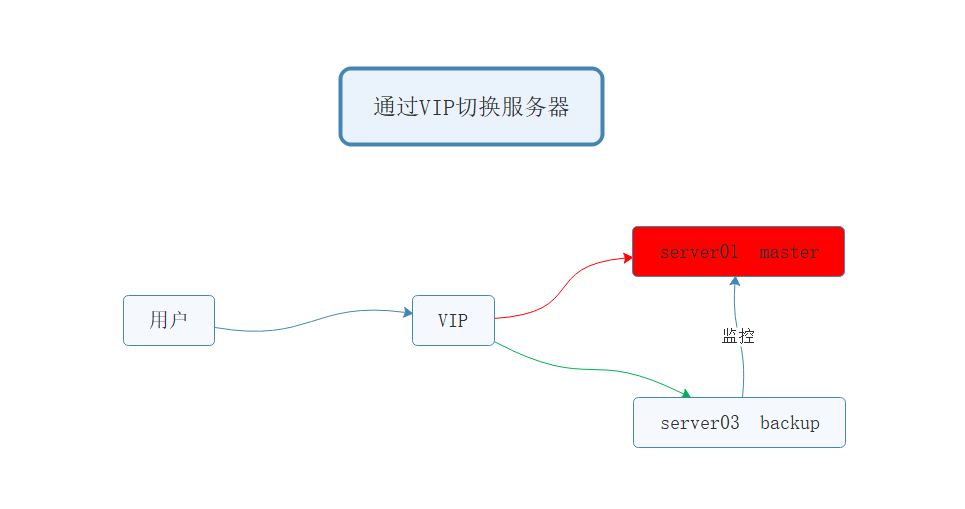
为了能够提高用户体验度,能够持续得给用户提供优质的服务,当web服务器不可用时,可以有备用服务器接替web服务器的工作,继续为用户提供响应。其中,还要解决一个问题,需要备用服务器能够快速自动切换过来。
一般将以上业务需求,称为实现服务的高可用HA。
需求拆分
也就是高可用的实现核心:
①冗余服务器(备份服务器)
②自动切换 可以通过绑定虚拟IP的方式 用户通过VIP访问服务

2.1、介绍
Keepalived软件起初是专为LVS负载均衡软件设计的,用来管理并监控LVS集群系统中各个服务节点的状态,后来又加入了可以实现高可用的VRRP功能。因此,Keepalived除了能够管理LVS软件外,还可以作为其他服务(例如:Nginx、Haproxy、MySQL等)的高可用解决方案软件。

keepalived主要使用三个模块,分别是core、check和vrrp。
core模块为keepalived的核心,负责主进程的启动、维护以及全局配置文件的加载和解析。
check负责健康检查,包括常见的各种检查方式。
vrrp模块是来实现VRRP协议的。
2.2、安装
master和backup都需要进行安装,也就是server01和server03机器
 #安装keepalived
  shell > yum -y install keepalived
主机名称 | 服务器IP | |
server01 | 192.168.17.102 | master |
server03 | 192.168.17.101 | backup |
keepalived需要使用的目录和文件:
文件或者目录 | 作用 |
/etc/keepalived/keepalived.conf | 生效的配置文件 |
/etc/init.d/keepalived | 服务器管理脚本 |
/var/log/messages | 日志信息写入的文件 |
2.3、配置
①备份主备服务器的配置文件
 shell > cd  /etc/keepalived
  shell > cp keepalived.conf keepalived.conf_bak
②分别修改主备服务器配置文件
shell > vim keepalived.conf
示例配置文件说明
 ! Configuration File for keepalived
  #发送邮件的配置
  global_defs {
     notification_email {
       acassen@firewall.loc
       failover@firewall.loc
       sysadmin@firewall.loc
     }
     notification_email_from Alexandre.Cassen@firewall.loc
     smtp_server 192.168.200.1
     smtp_connect_timeout 30
     router_id LVS_DEVEL
  }
  #vrrp协议的配置
  vrrp_instance VI_1 {
      #工作模式
      state MASTER
      #监听的网卡
      interface eth0
      #虚拟路由id 需要和备服务器一致
      virtual_router_id 51
      #权重 优先级
      priority 100
      #vrrp包的发送周期  1s
      advert_int 1
      #权限验证
      authentication {
          auth_type PASS
          auth_pass 1111
      }
      #需要绑定切换的VIP
      virtual_ipaddress {
          192.168.200.16
          192.168.200.17
          192.168.200.18
      }
  }
主服务器
 ! Configuration File for keepalived
  global_defs {
     notification_email {
       acassen@firewall.loc
       failover@firewall.loc
       sysadmin@firewall.loc
     }
     notification_email_from Alexandre.Cassen@firewall.loc
     smtp_server 192.168.200.1
     smtp_connect_timeout 30
     router_id LVS_DEVEL
  }
  vrrp_instance VI_1 {
      state MASTER
      interface eth0
      virtual_router_id 51
      priority 100
      advert_int 1
      authentication {
          auth_type PASS
          auth_pass 1111
      }
      #master默认只需要修改使用VIP即可
      virtual_ipaddress {
          192.168.17.200
      }
  }
备服务器
 ! Configuration File for keepalived
  global_defs {
     notification_email {
       acassen@firewall.loc
       failover@firewall.loc
       sysadmin@firewall.loc
     }
     notification_email_from Alexandre.Cassen@firewall.loc
     smtp_server 192.168.200.1
     smtp_connect_timeout 30
     router_id LVS_DEVEL
  }
  vrrp_instance VI_1 {
      #修改工作模式为备
      state BACKUP
      interface eth0
      virtual_router_id 51
      priority 100
      advert_int 1
      authentication {
          auth_type PASS
          auth_pass 1111
      }
      #注意修改VIP
      virtual_ipaddress {
          192.168.17.200
      }
  }
③分别按照顺序启动主服务器和备服务器的keepalived
shell > service keepalived start
④查看主备服务器的网卡信息
 #需要通过ip a命令查看  分别在server01和server03查看
  shell > ip a
2.4、模拟故障
模拟服务器故障宕机,查看是否可以切换服务到备用机器。
模拟宕机,关闭server01 master服务器,VIP自动切换到server03 backup服务器
 #抓包vrrp
  shell > yum -y install tcpdump
  shell > tcpdump vrrp -n


 IP短视频
IP短视频 C/C++
C/C++ 狂野架构师
狂野架构师 AI智能应用开发
 AI大模型开发(Python)
 AI鸿蒙开发
 AI嵌入式+机器人开发
 前端开发
前端开发 AI大数据开发
 AI运维
AI运维 AI测试
AI测试 AI设计
AI设计 AI视频创作与直播运营
 C/C++
C/C++ 产品经理
产品经理 拍摄剪辑+短视频制作
 PMP项目管理认证
 电商运营
电商运营 Go语言与区块链
 大数据
大数据 PHP工程师
 Android+物联网
 iOS
iOS .NET
.NET


